We know that the WordPress dashboard can be confusing to understand as a beginner business owner.
Learning the dashboard is something that keeps away many people from using WordPress, thinking that it’s too difficult to understand as someone who’s not “techy” enough.
We wanted to give a detailed description of what the WordPress dashboard looks like as well as defining some of the main terms used and how you can use it as a business owner.
PIN THIS POST FOR LATER!


1 | Logging in

When you first log into WordPress, your dashboard will look similar to the screenshot above. This is your WordPress dashboard. You can edit what is on your dashboard by clicking on screen options at the top.

Then, a dropdown will appear where you can select what you want to see on your dashboard.

Some of the options above won’t be included on yours because you may not have the plugins installed, but it will look similar to this.
2 | Posts

Posts are where your blog posts will be located. You can select to view all posts, add a new post, view categories or tags.

3 | Media

Next up is media. This is where any of your photos, videos, PDFs, and more are located. If you are just starting out, your library will be empty.
4 | Pages

Pages are next after media. Pages are the main anchors of your website. Here are a few of our pages:

You can either view all of your pages or click to add a new page.
Related Post: Common Beginner WordPress Mistakes (And How To Fix Them) Compilation
5 | Comments

Then you will see comments. These include all of the comments that have been left on your blog. If you are brand new, you won’t have any comments yet.
6 | Appearance

The appearance option is where people can start to get confused. This is where any of your themes and anything related to the appearance of your website is hosted.
Themes will include the standard WordPress theme options (which we wouldn’t recommend using if you are starting a business) as well as any other themes you have uploaded.
You can find free WordPress themes out there, but we would suggest investing in a theme. Take a look at our shop for premium themes!
Customize is where you can edit the details of the current theme that is activated on your WordPress account.
Here is an example of what the ChicServe’s Customize screen would look like:

Widget, menus, header, and background can be accessed both through the appearance option or once you click Customize.
A Child theme is a must for any business owner, who wants to customize the theme by editing the theme coding. A child theme is a theme that inherits the functionality and styling of another theme, called the parent theme. Child themes are the recommended way of modifying an existing theme.
So the “ChicServe” would be the parent theme. If you wanted to make any major stylistic changes to the theme that require editing the code, it is recommended to use a Child theme. You can learn more about child themes here.
Theme settings is where the XML format is located for your theme. You most likely won’t need to use that for anything.
Theme editor is where all of the style sheets and backend code is for your site. This is where you wouldn’t want to edit anything, unless if you have experience with coding because you could run into trouble.
7 | Plugins

Plugins are ways to extend and add to the functionality that already exists in WordPress. You can learn more about plugins here.
Related Post: WordPress Security 101: Keeping Your Business Protected
8 | Users

If you need to have multiple users with various login permissions, users is where you can add new or edit your own profile.
9 | Tools

Tools contain options to perform some non-routine management tasks. As a beginner, you most likely won’t need to use this option.
10 | Settings

Your settings options may look different from the above, depending on the plugins that you have downloaded. You should at the very least have general, writing, reading, discussion, media, and permalinks.
General settings is where you can edit your site title, tagline, URL, contact email address, timezone and more.
Writing is where you can edit your default categories and blog formats.

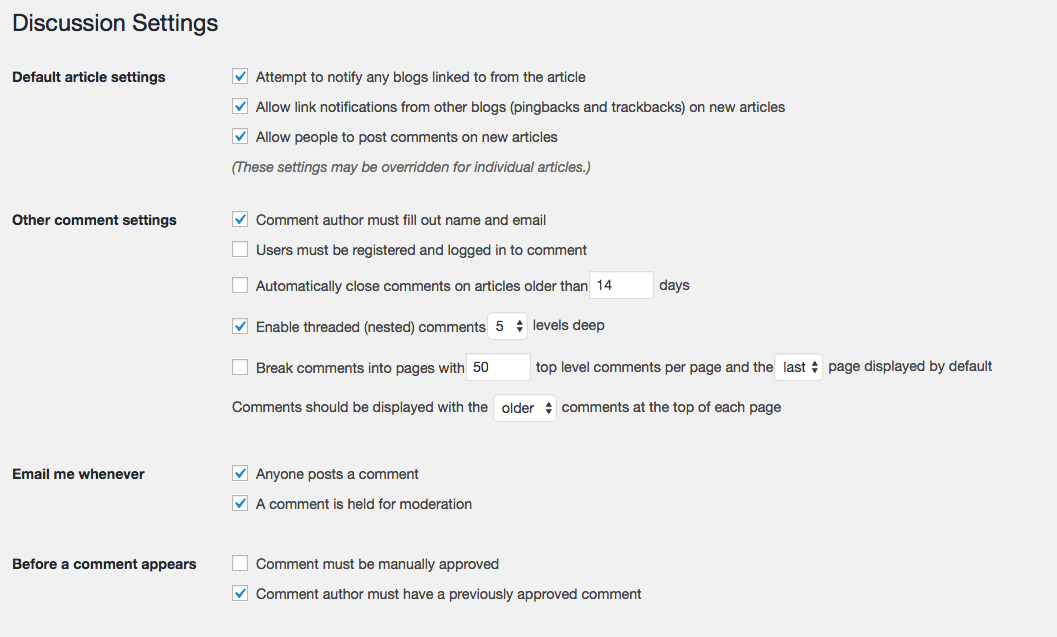
Discussion settings is where you can edit the settings for comments.
Reading is where you can edit what the front page displays (either your latest posts or a static page), how many blog posts are shown, and how much of each blog article you want to be shown.

Media is where you can determine the maximum dimensions in pixels to use when adding an image to the Media Library.
Finally, permalinks is where you can customize the URL structure for your blog posts.
Settings is a place where many plugins will also be listed as well.
We hope this beginner’s guide was helpful!